What is a perm?
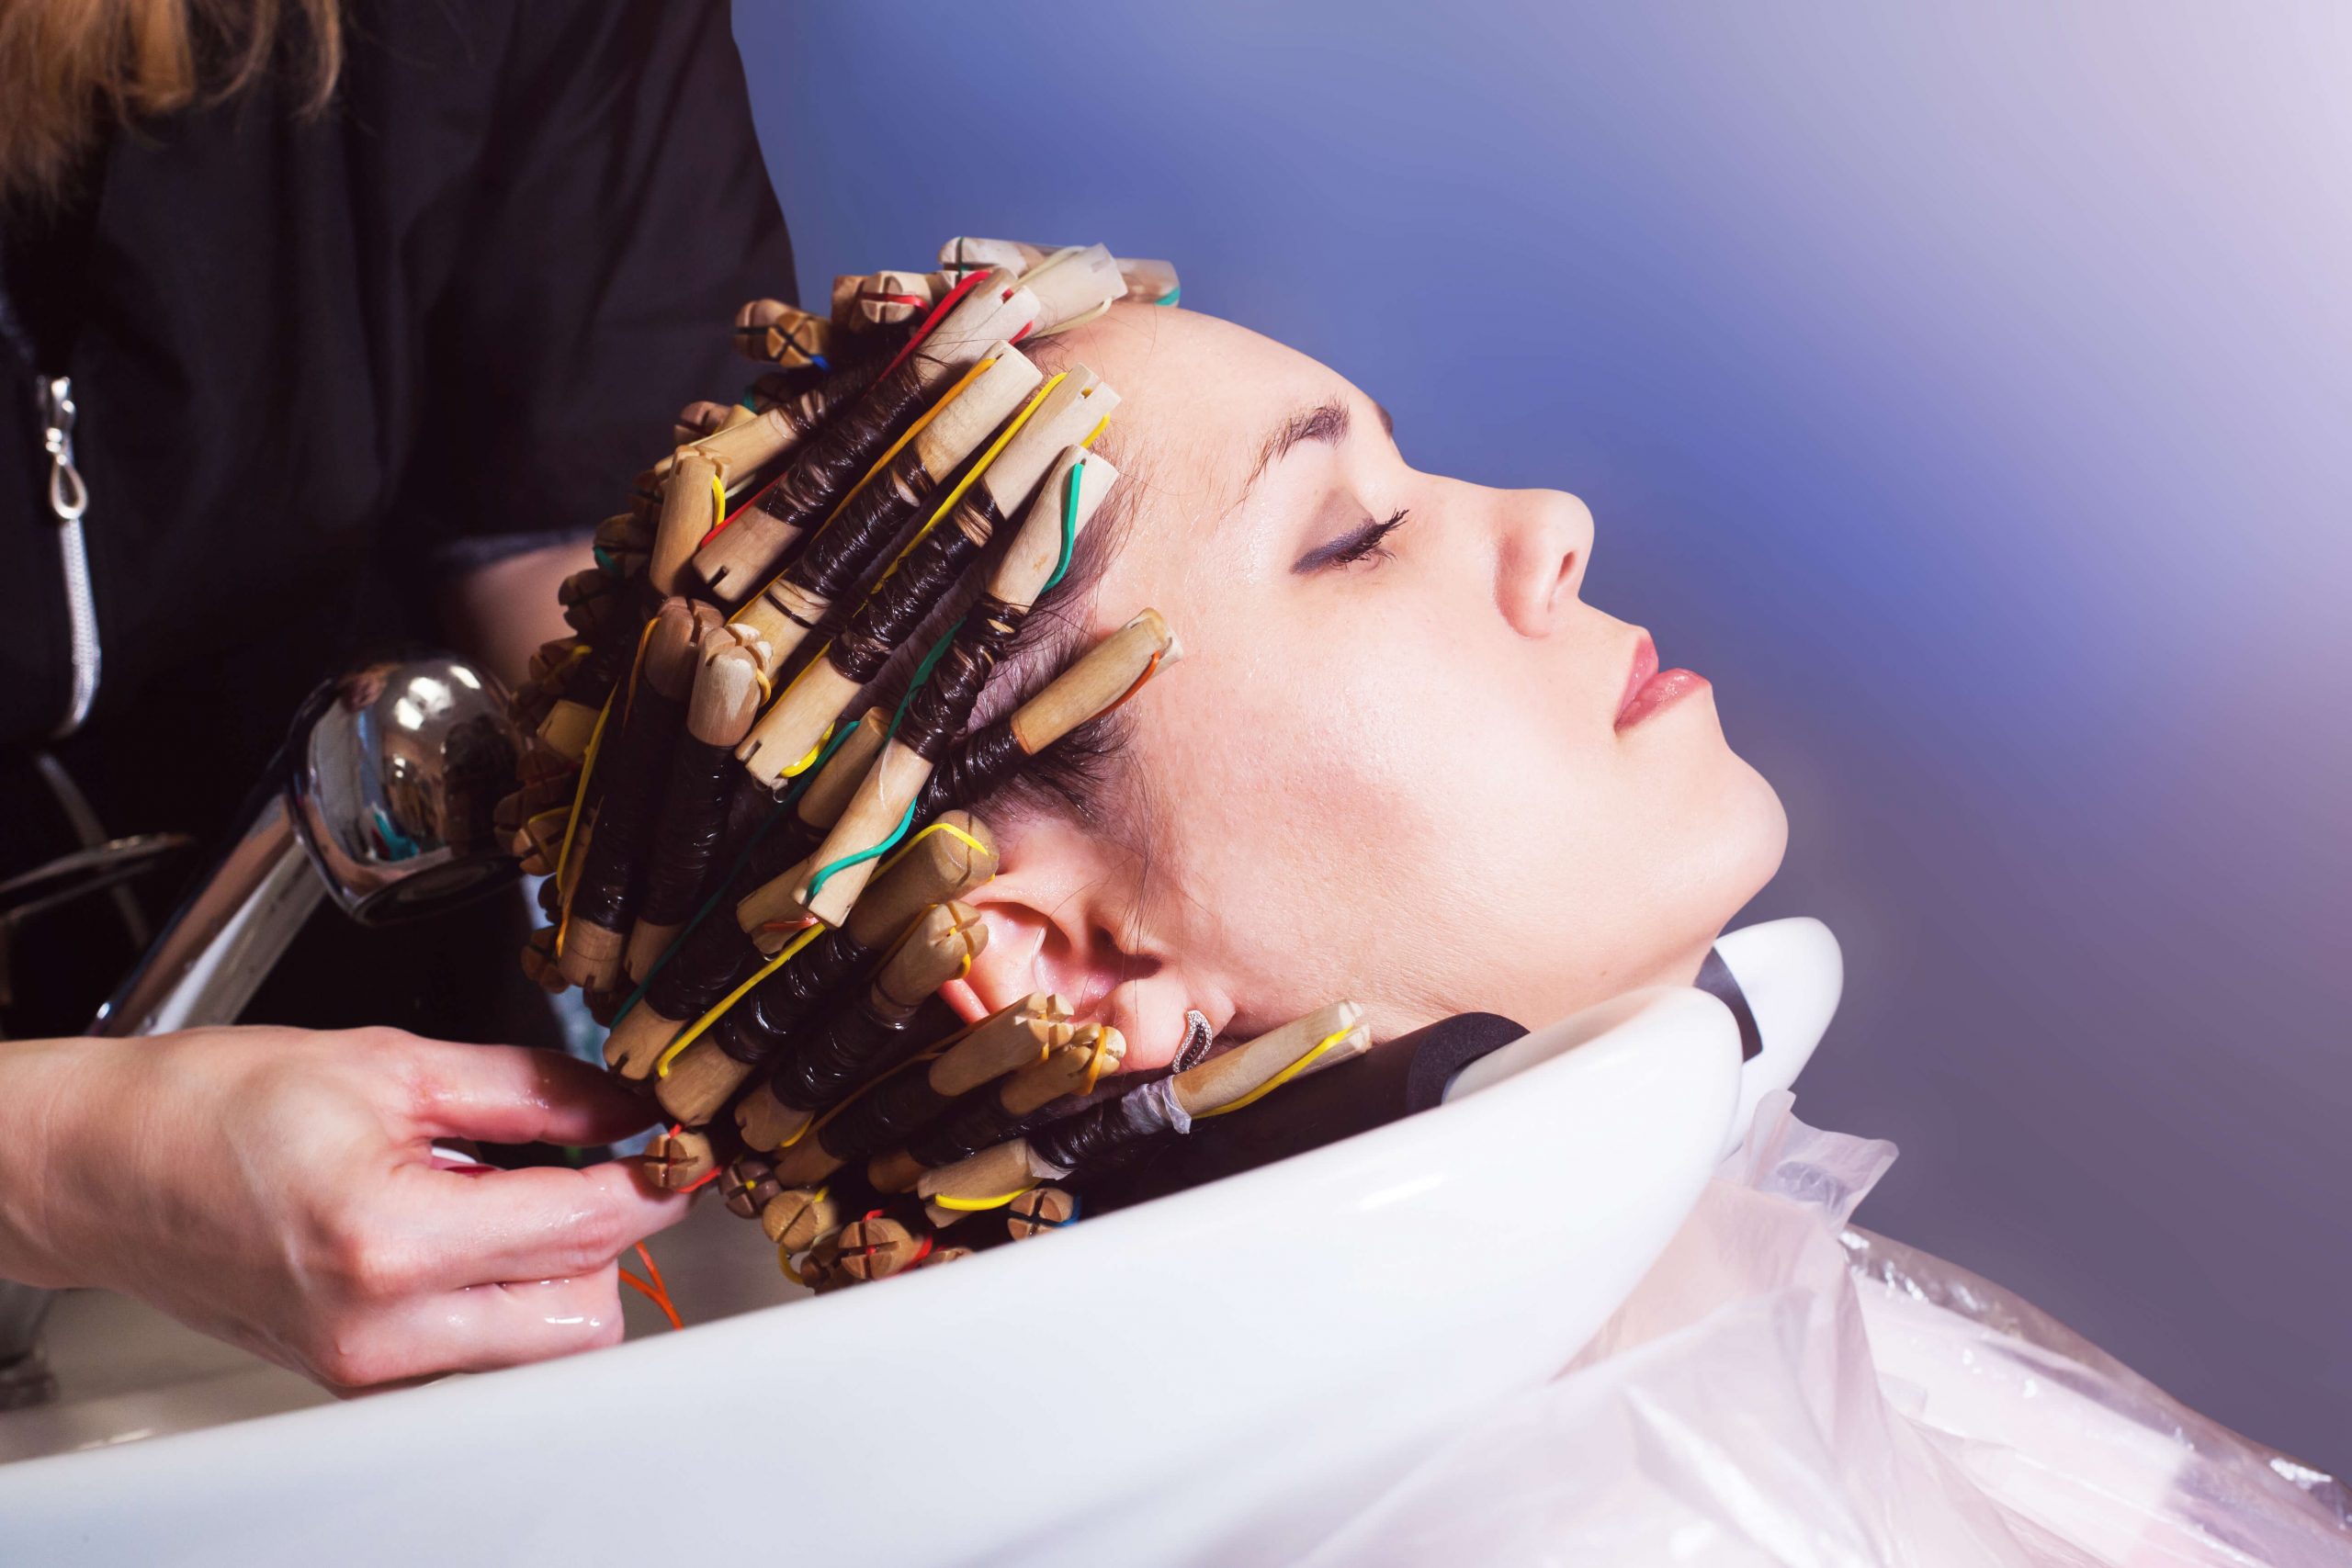
A perm is a chemical treatment on hair that alters hair’s natural texture. They have been around for over 100 years. Perm is short for permanent because this treatment permanently changes the hair structure.
Compared to perms of the past, today’s perms are softer. Modern hairdressers take straight hair and add curl or wave by wrapping hair around various size perm rods with a perm solution that works together to create a natural-looking curl wave.
What kind of perms are there?
There are two main formulas for perms, ceramic and digital. A ceramic perm leaves hair with a defined S-shaped curl. The curls tend to last longer and are voluminous while digital perms use hot rods with temperature-regulated machines with a digital display.
Some different types of perms are:
Body wave perm
This perm is excellent for creating more volume in straight, limp hair. A body wave will take a look with natural movement and bounce.
Multi-textured perm
A multi-textured perm is so natural that it is easy for the wearer to fool people into believing that it is their natural hair pattern. Stylists use multiple-size perm rods to create curls that fall naturally on each other.
Partial or spot perm
A partial perm brings life to a portion of hair that needs it. They only fix a part or spot of the head, and the rest of the hair remains unpermed. Partial perms are usually on the tips to create a curl pattern that matches the curl in the hair’s length.
Pin curl perm
Pin curl perms do not last as long as other perms. They make curls that are tight against the head. However, a pin curl perm is excellent for larger beach waves as well.
Root perm
Root perms are a lot like partial or spot perms, except only the hair’s root is permed. Root perms are cold or ceramic and require you to protect the rest of your hair before applying the perm chemical to it. It lifts the hair and adds volume without chemically treating the entire head.
Spiral perm
Spiral perms are a cold perm technique that uses the right size rods to create spirals, corkscrew curls, or looser curls.
Volumizing perm
A volumizing perm is mostly requested for thin hair. The rods are removed before the neutralizer is applied to increased volume and relaxed waves instead of uniformed curls.

Does a perm work for everyone?
Perms can be done on anyone who is old enough for permed hair. Different hair textures can make perming easier or more difficult for processing but perms can work for everyone. However, since a perm is a commitment that changes the natural hair structure, it is suggested that you do diligent research.
How long does perming last?
The amount of time that perms last varies between three and six months depending on how well it is maintained. One of the first rules is that permed heads should not get wet for 48 following the perm. Other things to maintaining a perm and help it last longer are:
1. Treat your hair like it’s naturally curly.
2. Condition and moisturize your hair. Use a conditioner with every shampoo and oils like argan and Moroccan oil to keep it moisturized and optimal.
3. Stay away from heat. If you have to use heat on your permed hair, be sure to use a heat protectant. Also, wait until your hair is almost dry and use a diffuser for the last few minutes.
Are perms good or bad for hair?
Perms are not good or bad for your hair. Although you can use a perm to get a head full of beautiful, lush curls with tons of volume that are easy to manage, perms can also cause some unexpected damage.
Some ways that damage can occur are:
1. Perm chemicals are inadvertently (through the sloppy application) applied to the scalp. The substances in perms can cause irritation, itching, redness, burning, and peeling.
2. Perms can leave hair more brittle, cracked, split, and susceptible to breakage.
3. The curlers or rods used to perm hair may be wrapped too tight, leaving the scalp irritated and sore.
4. Changes to hair texture may be permanent and not go back to their original texture once the perm has grown out.
How long should your hair be to get a perm?
As described above, different types of perms do better on various hair lengths. Body wave, multi-textured perms, volumizing perms are great for longer hair. Partial or spot perms, pin curl perms, and root perms are good for shorter hair.

How to perm your hair yourself?
For most of us experimenting with our is something we deeply enjoy! That’s why we don’t always want to go to a salon. Below you’ll find 3 step by step guides that you can follow to give yourself or a friend a great perm! There are 3 guides because below there are 3 methods explained. Have fun! Did you give yourself a pern with one of the guides below? Please send me a picture! I would love to see what you’ve created!
Supplies needed:
Perm kit (Select an alkaline kit if your hair is resistant or has low elasticity – Asian, coarse, fine hair. Select an acid solution kit if your hair is high elasticity, tinted, damaged, fragile, or highlighted.)
Towel(s)
Rattail comb and a regular comb
Clips to divide hair
Vaseline or petroleum jelly
Cotton batting wrap
Shampoo
Conditioner
Plastic cape and rubber gloves
Water misting bottle
Cold wave rods
Old tee-shirt
Endpapers
Metal duckbill clips
Curling iron
Blow dryer
Heat protectant
Oil
Method 1:
1. Put on an old tee-shirt, wash hair with clarifying shampoo.
2. Allow hair to dry. It can be damp but should not be dripping wet.
3. Wrap a plastic cape around your shoulders.
4. Comb hair and divide it into three parts. The middle section should be narrower than the perm rod rollers.
5. Use clips to hold each section in place.
6. Start with the middle section and part a small section of hair horizontally.
7. Comb with a rattail comb to make sure hair has no snags, knots, or tangles.
8. Place a piece of endpaper around the hair, folding it over to cover the front and back of that section of hair.
9. Slide the endpaper to the hair’s tip so that it is a little is beyond the hair and goes on the rod before hair.
10.Start with rods the size that you want your curls to be.
11.Roll hair downward, toward your scalp, and away from your face, towards your nape.
12.Repeat steps 8-11 until you are done with the middle section.
13.Separate the other sections into two rows and roll small areas using the same steps as above.
14. If your hair is dry and hard to work with, use a spray bottle and mist your hair with water.
15.Put vaseline around your hairline (forehead), ears, and nape, or
16.Use a cotton batting wrap and place it around the perimeter of the rollers.
17.Put on an old tee shirt.
18.Put on rubber gloves.
19.Pierce the tip of the perm solution, which is in a plastic bottle.
20.Apply the solution to the hair using small circular motions. Please do not waste your solution by applying it to the rods. It should go on the hair. Gravity will help the solution go all the way through the hair.
21.Check a section of hair after 5 minutes to see if you have an S-shaped curl. If not, re-roll hair.
22.Check every 2 minutes after that.
23.Once you have an S-shaped curl, you can begin rinsing the solution out of your hair.
24.Rinse for at least three minutes and longer if you have thick hair. You must thoroughly wash out all of the solution.
25.The cotton batting is soaked and can be tossed into the trash.
26.Drape a towel around your neck and let your hair dry with the rods in it.
27.It is best to let hair air dry, but a blow dryer may be used if you are in a hurry.
28.When your hair is dry, apply the neutralizer using the same technique used when applying the perm solution to the hair.
29.Let the neutralizer sit for 10 minutes before thoroughly rinsing it out.
30.The rods are still in your hair and should stay until your hair is dry.
31.Once you gently remove the rods, use your fingers to style your hair. Combs and brushes may damage your curls.
32.Wash all rods, combs, and supplies that the solution touched thoroughly.
33.Wait at least 48 hours before washing, conditioning, combing, or brushing your permed hair.
Method 2:
1. Put on old tee-shirt
2. Put on a plastic cape and rubber gloves.
3. Using a comb, section hair into quadrants and apply clips to hold each section.
4. Apply vaseline to the perimeter of hairline, around ears, and nape of the head.
5. If the perm kit calls for solution and neutralizer to be mixed, do so.
6. Without getting perm on the scalp, apply perm solution to roots downward. If this is a newly permed head, the perm should be applied down to the ends. If it is a touch-up, apply to new growth only.
7. Apply the perm quickly because it cannot stay on hair too long.
8. As you are applying the perm, use fingers to smooth the length of hair.
9. Move quickly from quadrant to quadrant.
10.Once the entire head is done, use the comb’s fingers or back to smooth the perm through the hair.
11.Follow your perms instructions for timing – usually 10-13 minutes total time.
12.Do not follow myths waiting for tingling or burning. That is damaging to your scalp.
13.Rinse the perm thoroughly.
14.The perm is rinsed out of the hair thoroughly, so shampoo the hair using the shampoo that came with the perm kit. Most perms come with a color-coded shampoo which will determine that all the perm is rinsed.
15.After all the perm is rinsed, shampoo hair once more.
16.Using your towel, pat or ring excess water from hair.
17.Generously apply conditioner and allow it to sit as instructed on the box.
18.To enhance conditioning treatment, add a plastic bag so that heat from your scalp warms conditioner.
19.When time is up, thoroughly rinse the conditioner from the scalp.
20.Apply a dime-size portion of heat protectant to hair strands.
21.Blow-dry hair.
22.Using a hot flat iron or curling iron to curl and style the hair.
23.Apply a few drops of oil for sheen.
24.Wash all supplies thoroughly that touched the perm solution.
Method 3:
1. Put on an old tee shirt
2. Put on a plastic cape
3. Bring a pot of water to a boil. Turn the burner off and put duckbill clips in hot water.
4. Comb hair to detangle.
5. Rinse hair with warm water to remove oil and products from the hair.
6. Perming should be done on semi-damp hair.
7. Put on rubber gloves.
8. Apply the perming solution evenly to the entire head of hair, avoiding the scalp.
9. Divide hair into sections and use clips to keep sections apart.
10.Starting with one section at a time, grab a piece of hair depending on the depth of curl you want.
11.Use the index fingers on both hands, create a curl with that section of hair.
12.Once the curl is created, hold it down with one hand and use the other and carefully to put a warm clip on it.
13.Repeat on each of the sections.
14.Let the solution sit for 10 minutes with warm clips.
15.Rinse solution thoroughly with duckbill clips in place.
16.Apply the neutralizer to each section and let that sit another 10 minutes.
17.Rinse the neutralizer thoroughly.
18.Carefully remove the clips.
19.Finger comb the curls before shampooing and conditioning hair again.
20.Dry and style hair.
21.Wash combs, clips, duckbill clips, and anything that touches the perm solution.
How can I style permed hair?
Permed hair cannot be washed for at least 48 hours after being permed and should not be combed or brushed. After that, permed hair can be styled however you like. Many enjoy the benefits of permed hair for the wash-and-go styles. For big, bouncy curls, allow hair to semi-dry under a towel and then finish with cream for softness and natural-looking air-dried curls.
Others use more styling products like mousse or holding gel for spiral curl looks or more uniformed curls. Permed hairstyles can be finished with a diffuser for perfect non-frizzy curls.
Still others with perms maintain straight styles by wrapping hair before sleep for sleek, straight styles maintained with anti-humidifying, frizz-reducing styling products.

Can permed hair be dyed?
Permed hair can be dyed. Color treatment should not be done for 10 to 15 days after a perm. If you do not have a professional stylist color your hair, make sure to look for color treatment with nourishing ingredients like keratin, argan oil, and ginseng root extract.
How much does it cost to get a perm at a salon?
The average cost of a perm in a salon is $80, depending on the area. Most people pay between $60 and $250 for a stylist they trust. To prepare for your salon visit, make sure that your hair is in optimal health, do hot oil and conditioning treatments, and get a trim to remove dry, damaged ends.
What things not to do with a perm and what to look out for:
Make sure hair is at optimal health before perming. Avoid other chemical treatments immediately before or after perming. Be dedicated to your chemically treated hair. Avoid using products that contain silicone or alcohol. Swimming in chlorinated water can damage permed hair. Cover your head when out in sun, heat, and humidity.


